Contents
- 1 📚 Introduction: A Warm Welcome to Our Visitors 📚
- 2 📝 What is Bookbinding? 📝
- 3 🔨 Materials Needed for Bookbinding 🔨
- 4 📖 Step-by-Step Guide: Creating Your Own Handmade Journal 📖
- 5 👍 Strengths and Weaknesses of Handmade Journals: A BookBinder’s Delight👎
- 6 📝 Table: Overview of Creating Your Own Handmade Journal 📝
- 7 🙋 Frequently Asked Questions 🤔
- 7.1 1. What types of paper can be used for handmade journals?
- 7.2 2. Can I use recycled materials for my handmade journal cover?
- 7.3 3. What types of binding techniques can I use for my handmade journal?
- 7.4 4. How long does it take to create a handmade journal?
- 7.5 5. What tools do I need to get started with bookbinding?
- 7.6 6. Can I create a handmade journal without sewing?
- 7.7 7. How can I add personal touches to my handmade journal?
- 8 👉 Conclusion: Take Action Today! 👈
- 9 📝 Closing Words 📝
📚 Introduction: A Warm Welcome to Our Visitors 📚
Hello and welcome, dear visitors! In today’s modern digital world, keeping a journal can be a convenient and quick way to jot down our thoughts and daily musings. However, there is something irreplaceable and special about a handmade journal, crafted with love and care by a skilled bookbinder. By creating your own unique journal, not only do you get to exercise your creativity, but you also get to enjoy a personal and one-of-a-kind journal that’s made just for you!


Whether you’re a seasoned bookbinder or a beginner, this article will guide you through the ins and outs of creating your very own handmade journal. From the materials you’ll need, the different binding techniques you can use, down to the final touches that will truly make your journal shine, we’ve got you covered. So sit back, grab a cup of tea, and let’s dive into the wonderful world of bookbinding!
📝 What is Bookbinding? 📝
Bookbinding is the process of physically assembling a book from an ordered stack of paper sheets that are folded together into sections or sometimes left as a stack of individual sheets. The stack is then bound together along one edge by either sewing with thread or by a layer of flexible adhesive. Binding method options are diverse, and depend on various aspects such as the purpose of the book, budget, time, and expected life of the book.
Here are some of the common types of binding methods:
Saddle Stitch Binding 🐴
This binding method is mostly used for thinner booklets or pamphlets, where folded sheets are bound together by staples along the folded edge.
Perfect Binding 📕
Perfect binding is commonly used for paperback books, where the pages and cover are glued together at the spine.
Spiral Binding 🌀
This method uses a plastic or metal coil that is inserted through holes punched along the spine of a stack of pages. The spine can be covered by a clear plastic cover or a cardstock cover.
Case Binding 📚
Case binding is a hardcover binding method, where a thicker cardboard material is used for the cover, and the pages are sewn together and glued to the spine of the case. A variety of cover options can be used, including different types of cloth, leather, or paper.
🔨 Materials Needed for Bookbinding 🔨
Before starting to create your own handmade journal, it’s important to gather all of the necessary materials. Here are some of the common materials you’ll need:
Paper ✏️
Depending on your preference, you can use a variety of papers for your journal. Popular choices include plain or lined paper, watercolor paper, or even scrapbook paper for a more decorative feel.
Cover Material 📏
Cover material is what gives your journal its overall appearance and feel, so choosing the right one is important. Some popular cover materials include leather, cloth, faux leather, or even recycled materials such as cardboard or old book covers.
Thread and Needle 🤏
Thread and needles are important for binding the pages together. You can use a variety of threads, including waxed linen, nylon, or even embroidery floss. A pointed needle is important for piercing through the pages and cover material as well as the spine of the book.
Ruler and Cutting Tools 📏
Accurate measurements are important in bookbinding, so having a ruler and the right cutting tools is essential. A bone folder or scoring tool will help to fold pages and create sharp creases, while a paper cutter or craft knife can be used to trim pages and cover material to the right size.
Glue or Adhesive 🧪
There are several options for binding glues or adhesives, including PVA glue, double-sided tape, or even a hot glue gun for a stronger hold.
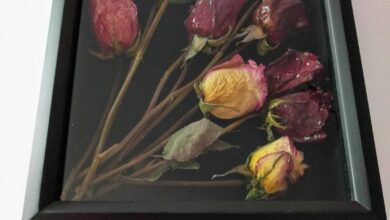
Decorative Elements 🎨
To truly make your journal unique, consider adding some decorative elements such as stickers, stamps, washi tape, or even your own drawings or illustrations.
📖 Step-by-Step Guide: Creating Your Own Handmade Journal 📖
Step 1: Preparing the Paper and Cover Material 📝
Beyond just selecting paper and cover material, there are a few specific things to keep in mind when preparing your bookbinding materials. Firstly, you’ll need to cut both your paper and your cover material to the desired size. As a rule of thumb, the cover should be around 1 inch wider than the paper on all sides.
Next, consider the orientation of your paper. Depending on the size and shape of your journal, it may be more convenient to fold your paper in half widthwise (creating a landscape orientation) or lengthwise (creating a portrait orientation). Once you’ve determined your desired paper orientation, fold your paper into sections based on how many pages you’d like in your journal. One common option is to fold your paper in half, then in half again, to create 4-page sections called “folios”.
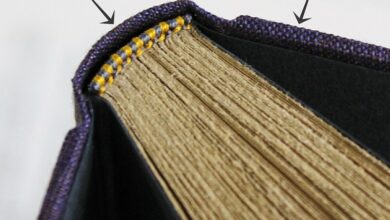
Step 2: Creating the Signatures 📜
A “signature” is a group of folios that have been folded together, ready for binding. Depending on the size of your journal, you may only need one or two signatures, or you may need several. Take each folded folio and nest them together so that the folded edges are aligned. Using a needle and thread, sew down the spine of each signature, going in and out of each fold.
Once you’ve sewn all of your signatures, tie off the thread but leave at least 1 inch of excess thread on each end. These excess threads will be used to attach your signatures to the cover later on.
Step 3: Binding Your Signatures Together 📚
Now that each signature is sewn together, it’s time to bind them together. Take your cover material and fold it in half so that it’s the same size as your signatures. Apply glue to the spine of the cover material, then line up your signatures along the spine and press them down into the glue. Clamp the entire stack together using a book press or heavy objects, and allow to dry overnight.
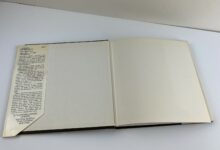
Step 4: Adding Finishing Touches 🎀
Your journal is almost complete! Once the glue has fully dried, you can remove your journal from the clamps and add any finishing touches you’d like. This might include adding endpapers to the inside covers, trimming the edges of your pages, or adding any decorative accents or embellishments.
👍 Strengths and Weaknesses of Handmade Journals: A BookBinder’s Delight👎
Strengths 👍
1. Handmade journals are unique and one-of-a-kind, making them truly special to their owners.
🎁
2. The materials used in handmade journals tend to be of higher quality than mass-produced ones, resulting in a more durable and long-lasting product. ⏲️
3. The creation process of handmade journals can be a therapeutic and creative activity, allowing crafters to express their creativity and reduce stress.
🧘
Weaknesses 👎
1. Handmade journals can be more time-consuming and labor-intensive compared to mass-produced ones, which may not be suitable for those with busy schedules.
⏰
2. There may be a higher cost associated with creating handmade journals due to the high-quality materials used.
💰
3. Bookbinding requires some specific tools and materials that may be difficult to acquire for beginners.
🛠️
📝 Table: Overview of Creating Your Own Handmade Journal 📝
| Step | Description |
|---|---|
| Step 1 | Prepare the paper and cover material |
| Step 2 | Create the signatures |
| Step 3 | Bind the signatures together |
| Step 4 | Add finishing touches |
🙋 Frequently Asked Questions 🤔
1. What types of paper can be used for handmade journals?
You can use a variety of papers for your journal, depending on your preference. Lined or plain paper is a common choice, while watercolor paper or scrapbook paper can add a more decorative touch.
2. Can I use recycled materials for my handmade journal cover?
Absolutely! You can use recycled materials such as cardboard or old book covers, or even repurpose materials from around your home to create a unique cover for your journal.
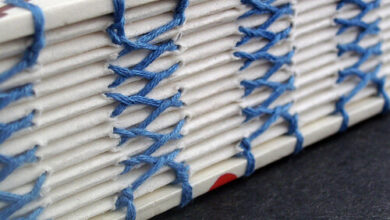
3. What types of binding techniques can I use for my handmade journal?
There are several binding techniques you can use, depending on your skill level and desired outcome. Some popular options include coptic stitch binding, pamphlet stitch binding, or even Japanese stab binding.
4. How long does it take to create a handmade journal?
The time it takes to create a handmade journal can vary depending on your skill level and the complexity of the design. However, it typically takes a few hours to a few days to complete a single journal.
5. What tools do I need to get started with bookbinding?
Some essential tools for bookbinding include a bone folder, a ruler, a cutting mat, a craft knife, a needle, and thread. You may also want to invest in a book press or other clamps to hold your book together as it dries.
6. Can I create a handmade journal without sewing?
Yes, there are several no-sew options for creating handmade journals, such as using adhesive instead of sewing to bind the signatures together or using a spiral binding machine.
7. How can I add personal touches to my handmade journal?
There are several ways to add personal touches to your journal, including adding decorative elements such as stickers, washi tape, or drawings, or even incorporating meaningful quotes or poems into the pages.
👉 Conclusion: Take Action Today! 👈
Creating your own handmade journal is not only a rewarding and enjoyable experience, but it also allows you to have a truly unique and personal journal that’s made just for you. By following the step-by-step guide and tips provided in this article, you’ll be on your way to creating a beautiful and one-of-a-kind journal in no time.
So what are you waiting for? Gather your materials, put on your creative hat, and start bookbinding today!
📝 Closing Words 📝
Creating handmade journals can be a delightful and rewarding experience that allows you to exercise your creativity while providing a personal and unique outlet for journaling. Remember to take your time when selecting materials and to enjoy the process of bookbinding. With patience and practice, you’ll be creating beautiful and cherished journals in no time.
Originally posted 2023-06-22 09:02:00.