Contents
- 1 📚 Introduction
- 2 📚 Step 1: Gathering Your Supplies
- 3 📚 Step 2: Creating the Signatures
- 4 📚 Step 3: Cover Creation
- 5 📚 Step 4: Attach the Signatures to the Cover
- 6 📚 Step 5: Book Finishing
- 7 📚 Conclusion
- 8 📚 Frequently Asked Questions
- 8.1 1. What is Bookbinding?
- 8.2 2. Can I use other types of glue?
- 8.3 3. Is there a specific thread I should use?
- 8.4 4. Is Bookbinding expensive?
- 8.5 5. How long does it take to make a book?
- 8.6 6. Can I make a book without a board?
- 8.7 7. Do I need to be an artist to make a book?
- 8.8 8. What is the best paper to use for bookbinding?
- 8.9 9. Is Bookbinding hard?
- 8.10 10. Can I make a book with mixed media?
- 8.11 11. What tools do I need to make a book?
- 8.12 12. How can I protect my bookbinding project?
- 8.13 13. Can I repair my bookbinding work if something goes wrong?
- 9 📚 Conclusion
- 10 📚 Disclaimer
📚 Introduction
Hello Visitors, are you interested in bookbinding? If yes, you are in the right place! Bookbinding is a process of assembling a book from an ordered stack of paper sheets that are folded together into sections. The goal of bookbinding is to create a robust and long-lasting binding that will preserve its contents for years to come. In this article, we will provide a step-by-step tutorial for beginners to learn the art of bookbinding.


In this tutorial, we will be working on a simple case binding with a hardcover. With this binding style, the pages are glued to paper strips, then attached to the spine of the cover. The cover is then fixed to the pages, creating a neat finished product. We will be covering everything you need to know, including the materials, tools, and techniques required.
So, let’s begin!
📚 Step 1: Gathering Your Supplies
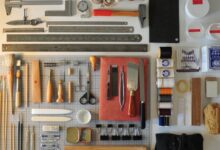
To get started, you will need to get the following materials:
📌 Bookbinding Board
Before you cut your binding board, make sure that it’s measured. The board’s thickness should match the thickness of the book you would be making—usually, the thickness of the paper packed tightly.
📌 A Sheet of Paper
To act as the endpapers and the cover paper, you need a large sheet of paper that is thicker than your interior pages.
📌 Glue
It is essential to choose high-quality glue for a bookbinding project. PVA (polyvinyl acetate) is a standard bookbinding glue and will work well.
📌 Cutting Tools
A good pair of scissors, ruler, and blade or paper cutter will come in handy.
📌 Needle and Thread
You will require a thread that is long enough to traverse the spine of the book. You can use nylon or linen thread for bookbinding.
📌 Stack of Papers
You will need a stack of papers to make your book. Make sure the papers are all of equal size and are precisely cut.
Once you have all of the supplies, you’re ready to move on to the next step.
📚 Step 2: Creating the Signatures
After gathering all the materials, the next step is to create the signatures. A signature is a folded stack of paper that makes up the primary contents of the book. To create them:
📌 Fold the Paper
Take your stack of papers and fold them in half crosswise. You can use the bone folder or your hands to press the crease. Make sure each crease is neat and sharp.
📌 Sew the Signatures
After you have folded all of your pages, you need to sew them together. The most common stitching method used in bookbinding is the Coptic stitch. Use your needle and thread to sew each signature to the next and make sure that it’s tight.
📚 Step 3: Cover Creation
After the signatures are sewn, it’s time to create the cover for your book. To create the cover:
📌 Cut the Board
You need to cut your board according to the size of your book. Use a good cutting tool to cut the bookbinding chipboard as close to the size or width of the signatures as possible.
📌 Glue the Endpapers
Use glue to attach your endpapers to the cover board. You need to cut the endpapers to the size of the board and apply glue to the board, then attach the paper. Trim the edges neatly and make sure the papers are adhered well.
📌 Allow the Cover to Dry
You should give the endpapers time to dry thoroughly. It might take up to 30 minutes for the glue to dry completely.
📚 Step 4: Attach the Signatures to the Cover
After the endpapers are dry, the next step is to attach the signatures to the cover. To attach the signatures:
📌 Glue the Paper Strips
Cut the paper strips with the same width as the height of the signatures. After that, glue the paper strips to the binding edge of the signatures. You need to wait until the glue dries.
📌 Attach the Signatures to the Cover
Attach the Signature to the paper strip and add glue to the strip before joining the board. Repeat the process to add the other signature to the board.
📌 Allow the Book to Dry
It’s important to let the book dry before opening it. It’s best to wait for at least 24 hours. You can add a weight on top of the book to make sure the glue is well-distributed and that the whole cover adheres well to the book.
📚 Step 5: Book Finishing
After waiting a day or more, it’s time to add the finishing touches. Here’s how:
📌 Trim the Excess Paper
Use a sharp blade to trim any excess paper from your cover. Trim away any stray ends or uneven edges, and make sure everything is clean and precise.
📌 Make the Hinge
Use a bone folder to make the hinge between the cover and the spine. Open the book and crease the fold where the cover meets the spine. This will make the book easier to open and protect the spine.
📌 Add Additional Features
You can add extra laminations, label cards, or different features, depending on your preference.
📚 Conclusion
We hope this step-by-step bookbinding tutorial for beginners has been useful! Bookbinding is a fantastic hobby that allows you to create a customized book to write, draw, or keep memories in. Remember to choose the right materials and tools, take care when sewing and gluing, and allow time for everything to dry. With enough practice, you’ll be binding like a pro in no time!
📚 Frequently Asked Questions
1. What is Bookbinding? |
Bookbinding is the process of taking a document, and making it into a book. |
2. Can I use other types of glue? |
Yes, you can use other types of glue but make sure it’s acid-free and dries quickly. |
3. Is there a specific thread I should use? |
Yes, you can use nylon or linen thread for bookbinding. |
4. Is Bookbinding expensive? |
It’s not expensive. You only need to purchase some tools and materials. |
5. How long does it take to make a book? |
It depends on your skill level and the complexity of the book. It can take a couple of hours to a day or more. |
6. Can I make a book without a board? |
Technically, you can, but it won’t have the same durability as a book with a proper cover and spine. |
7. Do I need to be an artist to make a book? |
No, you don’t need to be an artist. It’s just a matter of following instructions and having patience. |
8. What is the best paper to use for bookbinding? |
The paper used for bookbinding should be acid-free and of high quality. |
9. Is Bookbinding hard? |
It’s not very hard but requires a lot of patience and attention to detail. |
10. Can I make a book with mixed media? |
Yes, you can use mixed media to make a book. |
11. What tools do I need to make a book? |
You will need a bone folder, cutting tools, a needle and thread, bookbinding board, and glue. |
12. How can I protect my bookbinding project? |
You can use protective plastic sleeves or covers to protect your bookbinding project from dust and damage. |
13. Can I repair my bookbinding work if something goes wrong? |
Yes, you can make minor repairs if something goes wrong. |
📚 Conclusion
In conclusion, bookbinding is not rocket science; you can create a book with patience and dedication. The art of binding books is a skilled craft that takes time to learn, but with patience and practice, anyone can master it. We have provided an in-depth guide to help you understand the step-by-step process of bookbinding. We hope this tutorial has been helpful to you and inspires you to start bookbinding. Happy Binding!
📚 Disclaimer
The content provided in this tutorial is purely for educational purposes and does not constitute professional advice. The author, publisher, and distributor of this content disclaim any liability for any injury, loss or damage incurred in connection with the use of this tutorial.
Originally posted 2023-08-02 04:00:00.